Painting the house interior

Our money pit was already part painted when we bought it, in quite pleasant colours that suit our eclectic furniture. While I am grateful for the time saved on painting all 8 rooms (incl bathrooms and hallways), I’m a bit grumpy the painters spent no time preparing the surfaces. Already I can see where they painted over peeling surfaces and grimy areas, with our bathroom ceiling already peeling off in parts. At least sand and sugar soap, people!

Before we could move in I was determined to paint the two untouched enclosed verandahs and the toilet area. I needed to get these spaces ready so that I could teach my students in safety, comfort and with a professional look.

I chose a deep grey acrylic for the walls, bright white acrylic for the ceiling, and china white gloss enamel for the woodwork. The walls and ceiling are a buckling, unattractive masonry board and the window surrounds are an equally unattractive mish mash of poorly milled and installed 10mmx20mm timber. These areas will eventually be gutted, re-wired, insulated, replastered, and will have new windows installed, so I didn’t need to do much more than a wipe down and scrape to make them look respectable.

While I’m pretty happy with the grey, it can look a little purple in a cool light. I chose it from a Dulux sample in Bunnings, and didn’t check it in different lights. Nevertheless, it’s a cool yet warm colour and goes well with either blue or red tones, so I’m happy for now.

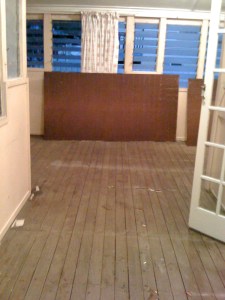
Here’s what the rooms looked like before, in delightful apricot (not):

Studio

Amazing what a quick paint can do, considering these look so awful.

DSCN3916 DSCN3933

Beautiful. Huh.

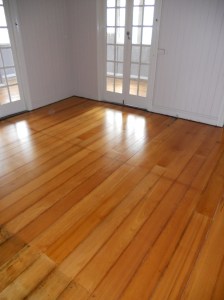
Anyway, after painting the walls and stuff, the rooms looked like this:

DSCN4004

As you can see, the poor excuse for a skirting board hasn’t been done. And it’s still not done in parts, even though I gave parts of them an undercoat last night when I had a spare moment (the things we do just before it gets dark!). The lovely looking windows at the end are a mess of flaky, poorly applied paint, poor skirting, fluffy wood grain and lots of work required. So I’ve left them for the time being, to be tackled sometime later this year. And I’ve not yet painted the French doors because I want to lavish time and attention on them, rather than do what was done to the rest of the French doors, which is a crime of bad painting and no preparation.

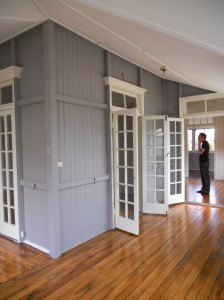
So now, the rooms look more like this:

DSCN4036

DSCN4019

Except we now have heaps of stuff in them, including an oversupply of pillows. I wish we had the type of house where a clear expanse of verandah was possible, but no. We need all the space we can get. Darn it.

Flooring maketh the house

When we bought our Queenslander, I stated firmly that there were two things that were non-negotiable in the purchase of the house. Firstly, that the floors had to be sanded and polished prior to moving in, and secondly that there had to be a workable kitchen.

We were really dealing with the bare basics here! Of course, that list grew to include a new toilet area and fixing those stumps. All other aspects got to wait, including replacing the louvre windows with laminated hopscotch windows, putting in a clean new bathroom and storage for our pantry and clothes.

So this post is about the flooring we chose.

The first night in the house, 3 hours after we got the keys and the title, we grabbed our spade and some gloves and began to tear up the old lino flooring. Underneath the lino was a layer of masonry board tacked to the floorboards, so we pushed the spade under and gently wedged up the old flooring, revealing the 80 year old 150mm wide hoop pine boards underneath. On the verandahs there were two types of timber: rare ash in the north and east wing, and regular hardwood in the western wing. From this:

Flooring

To this:

IMG_0727

To this:

IMG_0729


Flooring underneath

We removed all the old flooring in about 4 hours. Exhausting work, but we had to get the stump guys in the next day, I had to paint some more rooms, and then we had to get the flooring done. There was little time.

We pulled out as many of the tacks as we could find, and then our sanders came in and finished off the job 2 weeks later. They were great. Speedy Floor Sanding: ask for Dave. Barely talked at all but they were quick and got the job done in no time. They did a nice job on staining the new boards to look like the old ones, and even though you can tell they are there, they don’t stand out at all.

We found a hilarious dude called Michael Ryan to do some small construction work, including replacing the rotten floorboards (some borer in about 20 sq metres throughout the house) with new hoop pine. A semi-retired Irishman, I could barely understand him at all and many a story telling regaling friends about our renovation experiences had me saying “shushshsushshushhsh to be sure to be sure”. A good builder with years of experience, his clear preference was to replace all the old stuff with new, including replacing our wonderful old 12-light French doors with new cedar ones. 12 light! I can’t find any French doors that are more than 10-light. I didn’t let him go near anything but the floorboards.

DSCN3980

He replaced the rotten and borer riddled ones with lovely new hoop pine, like this:

DSCN3997


And this:

DSCN3982

This little room had previously been a bathroom and the boards were badly rotten, with even some old termite rot appearing. DH had thought he would tackle the replacement boards himself, but there was too much to be done, including some structural work, so we wisely left it to the experts. I had hoped to replace old with old, but Michael our builder wasn’t fond of working with old wood. Sigh. Anyway, the finished product looked a treat once sanded:

IMG_0742

This is halfway through the sanding process.

DSCN3983

This is the nailing process. Fun.

And these photos show the finished product. The sanders did a really great job, keeping all of the wonderful kinks and marks of 80 years on the floor and giving the floorboards a new lease on life. We chose a satin finish as it looks better, to my mind: less new. It degrades faster than a gloss finish but I like it and will use it again.

Don’t you just love the different timbers? Below is the ash.

DSCN4015 DSCN4018 DSCN4022 DSCN4025 DSCN4027 DSCN4029 DSCN4036 DSCN4040 DSCN4044


The Perfect Home

I am of the not unexpected opinion that the home you renovate/redecorate is the perfect home. Why, I hear you say? Well, because the feeling one gets when one has lavished time, money and energy on a successful house project is such an awesome feeling that it’s almost better than sex. Well, longer lasting, anyway. Annnnnd… I grew up in a house that was ALWAYS being renovated. I grew to love the smell of freshly sawn timber and paint. I blame my mother. Who is a renovating junkie.

So the house that DH (darling husband) and I bought is the perfect home – a renovator’s delight. Luckily, it has good bones and a lovely feel. We bought it on 31 July 2011, the VERY LAST DAY before stamp duty jumped up by $5000, which was like a little birthday present at the same time as the very best gift I could possibly imagine: our own home.

Well, I’ve blogged before about the craziness that accompanied the purchase of our very first house together. My main memory of the ghastly hunt that followed the exciting ambit offer made on the house was the lack of sleep that accompanied our bank application. For a month. And the lack of concentration that accompanied it. Anyhoo!
Here is a photo of the house once finance had been approved:

We bought a house!

Happy face! As you can see by the image, the house is in a totally unrenovated state, not substantially changed since about the 1950s. Some internal rooms have been changed since its construction in the 1920s and there is a dinky little entry landing that has been added to the side, but otherwise the house, which has a recently replaced roof, is pretty much original. Which I was stoked about.

We did the usual house inspection and found a series of small but not insurmountable problems. The first was that many of the house stumps needed replacing due to termite destruction:

IMG_0704

Also, there was a whole section of house that needed more stumps as the span was too wide to support the beams. It had been like that for years. So we replaced lots of the stumps with the usual metal stumps, and even raised one poorly placed stump to reset the floor level in the main bedroom. The blokes below did the stumping. Hilarious fellas, regaling us with tales about shonky dealers and poor workmanship. We replaced 6 stumps and added 3, and the house now feels much more secure (purely psychosomatic, I know!)

DSCN3986

I project managed the whole thing, and as we only had 2 1/2 weeks to do the whole house before we moved in, there was a sense of urgency about what needed doing.

Next blog: FLOORS and PAINT.


The classic Queenslander

Hi y’all. This blog is for those interested in house renovations, Queenslander homes in particular. Last year my husband and I bought our first house together, a somewhat fraught but ultimately rewarding experience. The house is a classic 1920s Queenslander home on a large block, and nothing much had been done to it over the years. It was in almost original condition. There had been some additions to the house – an extra gable here or there, but essentially the house is the same as it was in the 1950s, louvre windows and all! No bessa-block built in under the house – nothing, really. Its bones are good, the timber mostly solid, and even the flaking paint job isn’t completely horrid.

This blog will document our journey from house inspection to its current shape. There will be plenty of photos and a description of some of our more amusing stuff ups. I’ve kept extensive photo records of the old dear – Harry’s place, we call it. It’s after the old fella who lived here for more than 50 years. We’re probably the 3rd owners.

Enjoy our tales of Harry’s Money Pit – brought to you by Bunnings and Ikea.